Saturday, June 1, 2013

post-fanime re-cap

CAUTION: super long post w/ pictures

It's been almost a month since the last time I've posted. It's just been so busy the last few weeks T^T

The con's over and done and the last day of school just finished yesterday. Graduation is next week and I'll be DONE WITH HIGH SCHOOL. AWWYIS.


But more about the con-- 

Fanime Con is a four day con and I went on Friday (despite not being done with cosplays), Saturday, and Sunday.

I went on Friday with two Sophomore friends and my Marshall Lee buddy. We ended up waiting in the badge line for 3 1/2 hours, which was boring to no extent (Although we had it better than people who went for the thursday pre-reg pickup, apparently they had to wait 6 hours...). I was hoping to attend an armor making panel but missed it in the line (aww well, can't complain too much) ;A; On the bright side, at least we made it to swap meet (I LOVE SWAP MEET, planning on another post for swap meet haul). None of us ended up cosplaying on Friday since not one of us were done with our cosplays ;A; 


Saturday was more hectic, the group came over in the wee hours to get ready. In usual fashion, we ended up working on cosplays right until we had to leave to avoid missing the Adventure Time Meet-Up. 


FINAL COUNTS

  • FINN- totally done before Saturday :DD
  • FIONNA- finished her hat Saturday (but hat got lost afterwards ;A;)
  • MARCELINE- tried to make jeans, gloves and boot covers, but nothing worked out (T^T) so she ended up with reg brown boots, reg jeans, and beige (not yellow) gloves (BUT FUCK IT ALL, SHE STILL LOOKED FABULOUS)
  • MARSHALL LEE- all was done but his (her) guitar (which we finished on Saturday)
  • PRINCESS BUBBLEGUM- her's was pretty much done by Saturday :)
  • PRINCE GUMBALL- literally made his (her) jacket all on Saturday ;A; (BUT DONE)
  • LSP- she worked out her own shiz and LOOKED FABULOUS (GOD, I LOVE HER)
  • ICE QUEEN- all shit done, but I forgot the two blue dots on the first day (glued them on later)

Our Cake and Flame Princess were unable to make Saturday at the last minute T^T

Our Cake told us ahead of time, so I hiatus'd her cosplay and it's still in bits around my room and Flame Princess was done to begin with :)

We ended up going to the wrong meet-up spot, and were pretty late. The meet-up lasted only half an hour, which sucked cause there were so many people there, but at least (cause there were so many people) we're likelier to get a larger space (super crowded this year), or a larger time slot next year. There was also a STEAMPUNK AT GROUP *faints*

*stolen from tumblr*
mother of glob 
THEY SO COOL
;A;
i wanna do steampunk IQ next year.
anyways. 
We only made it to about 15 minutes of the meet-up in the end (it was only half an hour long) and we never really got any group pics before we split off, SUPER REGRETS. But we did get some good pair pics :)


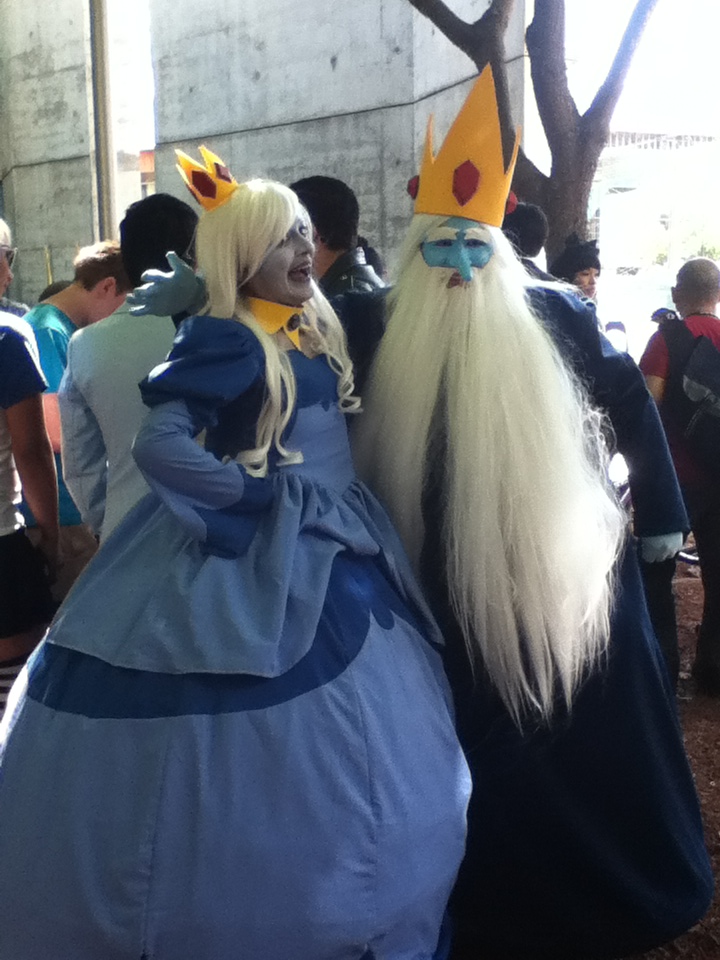
I managed to find a wandering Ice King for a genderbend groupie :)
It'sour Marceline and Marshall Lee!
they look motherfracking GOOD in gray ;A;
PB and PG
THEY SO CUTE T^T
PB and Finn
"I love you Princess Bubblegum!"
*stolen directly from Finn's fb*
Our Fionna was doing two cosplays
and she changed back into her Baron Nashor (League of Legends) before I could get pics of her Fionna
;A;
(but at least her Baron looks really good)
And I found a wandering Jake to bro-fist :)
awwyis.
Other than forgetting the other two circles (hope not too many people noticed ;A;), my crown only had one bobby pin attached in the back (silly decisions) and flopped all over the place, so I need to fix that, and my bustle was also all over the place (as can be seen in the pics), so I need to figure out a way of keeping it in place.

I spent most of the day wandering with Marshall Lee and Fionna (as Baron). I'd wanted to go to another armor panel and the DollDelight fashion show in the morn/afternoon, but missed both as we were still getting ready (cosplay problems T^T) After the meet-up, Marshall Lee, Fionna/Baron, Brolaf (Olaf skin from LOL), and I made our way to the pokemon meet-up to chill with another friend who was cosplaying Dewott. After that, Marshall Lee, Baron, and I went to Quickly's (bubble tea cafe) for yummies (i had lychee slushie with grass jelly -u-) and some little girls there thought I was a fancy princess (and I didn't have the heart to tell them I was an evil kidnapping queen) so I took some pics with them and left with questionable morality. We had planned on coming back with enough time to check out Artist Alley, but by the time we came back, it was closed :(


Around this time (7ish) we re-grouped and since Dealer's Hall and Artist Alley were both closed, my camera was out of batteries, I wasn't really into any of the later panels or movies, I still had work to do for a friend's Damara cosplay for Sunday, and my feet were killing me, I went home with some other friends who were leaving.


Sunday, since most other AT-ers planned on going only Saturday and the ones who were, were doing Homestuck for the Homestuck meet-up, Marshall Lee and I were the only ones to re-wear our AT cosplays. Our planned Cake did Damara, PB did Aranea, and our Finn did Gamzee (crazy character difference *__*) Their group also included a Kankri, Mituna, Cronus, and Meulin (so mostly dancestors, plus Gamzee) 


That day, Marshall Lee and I explored Artist Alley (FINALLY), which took a mofo-ing 4 hours of WONDERFUL. I swear, we stopped by pretty much every booth to check out junk. We had a GIANT STACK of business cards to deal with when we left and we couldn't be happier :)


However (HUGE regrets) I was supposed to get some spending money from mi mama before I left (I'm a senior, I shouldn't depend on my parents for this shit, i know ;A;), but we both forgot and when I remembered in the car, my dad, who was driving us to Fanime, had only about $5 in QUARTERS (...) in the car, so I definitely wish that could have gone better. My Marshall Lee bud (god bless her) let me borrow some of her money so I was thankfully able to buy some good junk (which I'll definitely  share in the post with the Swap Meet haul -u-)


By the time we left, my feet hurt like hell and i spent the rest of the day walking precariously on the heels of my heels (hope that makes sense) to spare my poor toesies ;A;

They still have blisters and I'm avoiding shoes like the plague. Thank glob, it's practially summer here and it'd be weird NOT to wear flip-flops :)


After Artist Alley, we visited our friends in the park, where they were chilling after the Homestuck meet-up. We took some pretty photos and then headed over to Johnny Rockets for sustenance. I managed to take off my hoop skirt inside and the management was super nice enough not to complain :) We ate some junk, refreshed our make-up and headed back to the con. 


Dealer's Hall and Artist Alley were again closed by this point, but we went to the game room for some board games. I won a game of Apples to Apples and Hungry Hippos, but left pretty fast after they opened Dirty Minds (-A-)


Marshall Lee was nice enough to wander with me as I attempted to find a group of rumored Angelic Layer cosplayers. Angelic Layer is my favorite manga of all time. No Question. I'd met a Hikaru cosplayer earlier that day in Artist Alley and she said she might be joined by her friends who were also cosplaying Angelic Layer and I just freaked out (*__*) Sadly, I don't know if they came or not and I didn't end up seeing them T^T If anyone knows anything about this, I'd love some kind of picture of their cosplays (sorry for creeping) 


Eventually it was around 10:30 and we left for home sweet home. 


Monday, I figured it was high time to write my final essay for AP LIT, but our Aranea/PB, and Marshall Lee ended up going again, which was fun for them :) (only a wee bit jealous) (*__*)


NEXT UP: FANIME HAUL!


Tuesday, May 7, 2013

Flame Princess~

FLAME PRINCESS' DRESS IS DONE :)
it's flippin done!!
i'msohappy.

Look how cute she is.
Just look at her.

The episode she's cosplaying is "Vault of Bones" and it's super cute.

The top pattern was made from a tape model and I used broadcloth (frown upon me o experienced seamsters and seamstresses, FROWN AWAY). The skirt a 4 piece A-Line, also made from broadcloth. The flames (the most time consuming bit and also my favorite bit) are made from canvas sandwitched by two layers of red broadcloth. 

WHAT I LIKE: 
  • I like that I finished.
  • UM. I like the flames at the bottom.
  • I like the that the top is actually interfaced. (BABY STEPS)
  • I like our cosplayer, she's super awesome.
WHAT COULD BE BETTER:
  • The bunchy bit under the boobs.
  • The flames at the bottom should be bigger
  • The red part at the top should also be bigger.
  • You can't even tell she has a petticoat under the dress.
  • I used broadcloth. 
    • (I'd bought it ages ago and it was the the right color ;A;)
    • *hides in shame* 
  • The colors for the bottom flames and the top detail don't match.
  • The gems aren't done.
    • FUCK, still need to make her gems... (i'm not done.)
    • disappoint.
We considered a few different ways to make/buy gems (resin, craft stores, online, sugar candy) but in the end, we ditched attempting clear gems in favor of cheapness and we're currently planning on making paper gems with two billion coats of mod podge. 
YAY, MOD PODGE!

NEXT UP: MARCELINE BOOT COVERS

also, AP LIT TEST ON THURSDAY *shoot me now*

Saturday, May 4, 2013

Ice Queen fabrics

I was hunting through our local Savers (thrift store) and if you read the hoop skirt post, you'll know I thrifted some white bedsheets for that, but as I was searching, some blue ICE QUEEN colored bedsheets had also caught my eye. Each one was $1-$2, so I bought 3 blue sheets as well and ran with the idea. 


BEDSHEETS, salvage, and RIPPED THREAD.
The darker two seem to be matte cotton (which is what I was planning on getting), but the lightest one definitely has a sheen to it. I can easily see the problem with not having enough fabric and not being able to buy more, so I'm taking my time to make sure all the pieces will be the right size and ripping the seams from all of the edges to maximize the lengths of the sheets. In this extremely pain-staking endeavor, I salvaged some elastic from the dark blue bed sheet and some blue bias tape from the medium blue one. Each bed sheet took about 3-4 hours to rip the seams ;A; 

The medium blue is in great quality, the dark blue is good, but not as good, and the lightest one is pilling.

I'm currently planning on using the darker two for the dress and the lightest one for a petticoat in between the dress and the hoop skirt.

I have no idea how the dress will turn out, but as this was hoards cheaper than buying fabric from a fabric store, it's worth a go.


WIGS!

~ I got ma wiiigs. I got ma wiiigs. I got ma wiiigs. I got ma wiiigs ~

Last Thursday (April 25) I ordered two wigs from animestuffstore.com
I received them on Tuesday (April 30) which was perfectly in the 4-7 days they gave for shipping, but cost me a good $12, but either way, props for quick shipping.

My first wig was for Ice Queen- click here to see webpage 
(Ayumi-Snow White- 29"-- $27) VERY PRETTY.
The second was for Beth- click here to see webpage
(Tomoyo- Natural Black- 32"-- $25) ALSO VERY PRETTY.
Shipping at this store was quite expensive. I was originally intending to buy the Ice Queen wig off an ebay retailer, but chose this one instead to lessen shipping and for a better guarantee on quality. 

SO, TO THE REVIEWING~
ICE QUEEN WIG:
FRONT
and an obligatory IQ pose
and the BACK
this was a hard picture to take, kept missing ;A;
When I first saw the wig, I was a bit wary that it would be too pretty for IQ. Even though most IQ cosplayers use a straight wig, I wanted a wavy one, as her hair does have a wave to it. This wig is shorter and curlier than I would have liked, but overall, I accept it. As a curly wig, it doesn't tangle or shed too badly and we'll see how the curls keep. It's a bit shiny in natural lighting and I can only assume it'll be worse with flash, so I plan on running some baby powder through it eventually. The head model they used looked small, so I was worried it wouldn't fit my head, but the sizing was surprisingly good-- snug, but not too tight.

BETH WIG:
FRONT
*i be watchin' you all sleep*
*_____*
BACK
i see you seeing my art wall of art which i mostly did not art.
so here's a (marginally) better pic :)
i like my doctor who poster best <3
BACK TO THE WIG, for a Beth cosplay, I'll definitely need to style the bangs and the ends. I thought it would be a bit too long, but I the length came out really well, although I'm starting to think long wigs make people look shorter. In natural lighting, it doesn't photograph too shiny, but we'll see what happens in flash. This one tangles a bit more than the other wig, which is probably because it's straight and doesn't have curls to keep its shape. I've tried to brush the tangles out with my fingers, but that causes some shedding, so I'm a bit wary of that. As with the other one, I was worried it would be too small, but it was a nice fit. 

To max my use of the wigs, I'm making lists of other characters the wigs could potentially be used for, but I haven't come up with much yet. 

White wig: other Ice Queens (Sailor Moon crossplay, Pre-Ice Queen~Simonne, steampunk Ice Queen) Storm (Xmen), female Appa gijinka (Avatar, the Last Airbender), *possibly* TARDIS (Doctor Who), Totoro gijinka (Tonari no Totoro- Ghibli), Athena (Angelic Layer), Derpy Hooves (My Little Pony), Yue (Avatar, the Last Airbender), Harley-Quinn (Batman- DC Comics), other potential gijinkas, any lolita, and various steampunk

Black Wig: Other Marcelines, Mio (K'ON), Jade (Homestuck), Wonder Woman (if I can curl it right) (DC comics), and again, other potential gijinkas, any lolita, and various steampunk

Also, if anyone noticed in the other pics, I was testing out some gunmetal lipstick
Our PB cosplayer (my main call to arms buddy aka *we do most of the work and we're tentatively ok with that*) ordered some lipstick samples from mybeautyaddiction.com 
She was able to order their 3 sample for $4 deal from their etsy, but I can't seem to find the page, so here is the link to the deal on their home site. We ordered gunmetal, sapphire, and sinful.
it's little capsule on the left (and the bobbin is for scale)
regular smile
(and i apologize for my face, my skin hasn't been my best buddy of late)
teethy smile
FROWNY FROWN
i don't know what face this is, but i have a wig on, so it's ok
It stays on pretty well and the color is wearable, so I like it. The little capsule is also a good size for a one-time use. 
I originally wanted blue lips for IQ, but the sapphire was too dark, so right now I'm planning on using this color for IQ. I'm still debating whether I should try the sapphire mixed with some something to make it lighter (would foundation work?). 

SO THAT'S THAT.

STILL TONS OF SHIT TO DO.
HUZZAH.

Friday, May 3, 2013

Adventure Time Group Cosplay

As one of the few in a large cosplay group able to sew, I feel a mixture of honor and panic. A cosplay group of TEN. I very much want everyone to look amazing, but I'm a bit worried about deadlines and disappointing my groupmates ;A;

We are an Adventure Time group going to Fanime '13
Our entire group!
LSP, Marceline, Flame Princess PB, Finn, Cake, Fionna, PG, Marshall Lee, Ice Queen

So Of these, I'm making/ have made Marcy's jeans, gloves, and boot covers, Flame Princess's dress, Finn/Fionna backpacks, Cake's jacket and tail, PB's jacket and boot covers, PG's jacket, Marshall Lee's guitar, and my very own IQ dress. I'm also helping LSP alter her dress and Fionna make her own hat.

Progress List:
  • Lumpy Space Princess
    •  Dress- bought, but still needs alteration
  • Marcy
    • Jeans- made ill-fitting mock, need to fix and start final pair
    • Gloves- made tape model, but lost thumb before I had a chance to pattern
    • Boot Covers- ALMOST DONE!
    • Guitar (backpack) (if possible)- bought fabric, need PVC pipes and pattern
  • Princess Bubblegum
    • Jacket- DONE DONE DONE
    • BMO (if possible)- 
    • Boot Covers- bought fabric and used rainboots, need to cover...
  • Flame Princess
    • Dress- made the skirt, flames, and petticoat-- just need to finish top
  • Finn
    • Backpack- ALMOST DONE, need to add zipper and stuff pillow for inside
  • Cake
    • Jacket- cut pieces, need to sew together
    • Tail- have fabric, need to pattern and sew
  • Fionna
    • Backpack- ALMOST DONE: just need to stuff pillow for inside
  • Prince Gumball
    • Jacket- bought fleece, but cosplayer is rethinking fabric (cause heat)
  • Marshall Lee- 
    • Guitar (backpack)- have fabric and PVC pipes, just need to pattern and sew
  • Ice Queen
    • Hoop Skirt- DONE DONE DONE
    • Dress- patterned and fabric bought, just need to cut and sew
GUYSS, TOO MUCH TO DOO ;A;

Fanime is in 21 days, during which I also have 3 AP tests and graduating HS.

On the bitsy brighter side, LOOK AT IT, IT'S BEAUTIFUL.
PB Jacket (FRONT)
PB Jacket (BACK)
The color is a quite off ;A; 
It was one of those things-- I was in the fabric store and I had my ref on my itouch, but somehow, I misjudged the color and by the time we realized the jacket should be way more purple, we'd already made the base...
I guess it is what it is ... OTL
I'll just have to pay better attention next time...
It's also not technically supposed to have a zipper, but following the examples of other PB cosplayers, creative liberty?


More good news, my Ice Queen and Beth wigs came on Tuesday!! I haven't had the time to review them yet, but I'll do my best to post pics tomorrow.


Tuesday, April 30, 2013

"Love is All You Need?"


This has nothing to do with cosplay or sewing, but this video made me bawl. 


If you have a minute, please watch this video.

It is a beautiful video. Not only was it well thought out and executed, it connected to a privileged audience. It takes a general consensus of people who identify as straight and tend to view heterosexuality as the "normal" progression of feelings and flipping their environments. The creators of this film wanted more than sympathy from their audience, they wanted EMPATHY. By replacing a setting where heterosexual feelings are accepted with one where they are not, they show us how different things could be. 

I cried.

Monday, April 29, 2013

Ice Queen- Hoop Skirt

DISCLAIMER: long-ass hoop skirt tutorial
With not nearly enough pictures *cough--sorry*

THIS SKIRT.
LOOK AT IT.

Once deciding to cosplay Ice Queen, I decided there was no way I was going to cosplay it without a hoop skirt.


THIS. 
Is my attempt.
And yes, I'm a bleach blonde :)

Some tutorials I found particularly helpful were yiji's tutorial on from Deviantart, thedreamstress' tutorial, and TheLacedAngel_TSMP's tutorial on instructables.
Yes, these are the very first three sites that google gives you when searching "hoop skirt tutorial" and for good reason.
Nonetheless, in the end, I decided to combine a few different techniques to make my hoop skirt.

Materials: 100 ft of poly tubing (or poly piping) (home depot), two white, thrifted (and washed) bed sheets, white yarn, a yarn needle, ruler, some kind of waistband drawstring, ribbon, and drafting paper of sorts
TOTAL COST: $15-16

^ mad photo skillz ^
1. Draw out how you wanted it to look on your proportions (I used 4":1" scale), using the height as the measurement from your waist to the floor (with shoes on) (originally 45" for me) and make horizontal lines for where you wanted the hoops to go. Generally, you use more hoops where the curve is more defined and fewer in the less defined areas. Also note the widths in between each hoop, again, less space in more defined areas, and more space in less defined areas.

(I may have gone overboard with the hoops. Way, way overboard. In the end, I removed 4 of the hoops I planned, leaving a whomping 11 hoops. WAY more than most hoop skirts. I will mention more about how this turned out later.)

The waist width is the diameter of my waist, (waist measurement (aka circumference) / π). I then did some more mathy things, of which I am very proud. 

Using a ruler, measure the lengths of each line on your draft and multiply each measurement by 4 (as scale was 4":1") so you end with the diameters of each hoop in real world proportions. Each diameter was then multiplied by π, leaving you with the circumferences of each hoop.
2. As you may have noticed, the white layer on the skirt was not gathered like in many other tutorials. 


do you see the difference?


My goal here was to test out the pattern for the overskirt and make and make sure it would flat over the hoops.
To do this, more mathy things had to be done.


pattern for 1/8 of the skirt
the axis and horizontal lines are kind visible if you squint 
-___-
If you do not have huge paper, you can either tape a bunch together or do it in smaller scale. 
To make this, first make a vertical axis using the distances between each hoop as markers. Then divide each circumference you found in step 1 by 8 to get the width of each horizontal bar. 
From here you can either add 1 inch to each measurement to account for a 1/2 inch seam allowance on both sides, then draw the bars out and connect the sides
OR draw the bars using the measurements you have now, connect the outer edges of the bars, then add a 1/2 inch (or whatever you feel comfortable with) seam allowance

FOR NEWBIES: a seam allowance is the space you leave at the edge of a piece so there is room to sew the pieces together-- here is a better explanation.

Then cut out your wonderful pattern.

3. Cut out your corresponding fabric pieces For later reference when adding hoops, mark out on each piece where the hoop goes. You don't have to mark the entire bar, marking just the meeting point between each bar and the middle axis is fine. Then sew the pieces together to make a GINORMOUS skirt. NOTE: I used a sewing machine for this part and highly recommend you do too. Hand sewing is "possible," but a painful alternative. If you do not have a sewing machine, borrow a friend's machine. It will save you HOURS.
Almost done with the skirt, all you need is a waistband. For some reason, the first time around, I thought a very thick elastic waistband would work, but let it be known it probably won't. Especially if you have as many hoops as mine did. I ended up having to add a drawstring waistband after the hoops were attached which was absolutely ridiculous. 
Drawstring waistband. Do it. 
If you are comfortable sewing buttonholes, you can sew two in the top hem, then turn it over and sew it down to create a casing for the drawstring. If not, you can also sew a ribbon around the top , leaving space between the ends for the drawstring to come out.

4. You have your skirt, now HOOPS
First add up all the total circumferences and make sure it is LESS than 90 ft (this is where two of my original hoops were dropped due to lack of tubing and the reason for leaving the extra 15' will be explained soon). Then cut the lengths correspondingly-- hints on how to do this: use a measuring tape (obv) and put marks on small patches of duct tape at each point you plan to cut before cutting, to make sure you don't end up short)

At this point, I, the silly that I am, duct taped the ends of the tubes together and ended up with: 
but much less delicious.
(good god, i miss palmier pastries as a vegan.)
Because the tubing was so tightly coiled in the packaging, it did NOT make beautiful, perfect circles like I expected. The taped parts inverted on the larger ones and protruded on the smaller ones. THUS in my moment to absolute clarity, I decided to deploy yet another hoop and instead, use it to create support for the other hoops. 
THIS is where the extra 10' come into play. 
LSP! LSP! LSP!

Cut these feet into appropriate lengths for the hoops (smaller pieces for smaller hoops and bigger pieces for bigger hoops), and cut along the inner side, like the green line in the badly drawn diagram above. You will then end up with a tube with a slit along it. take one side of the slit and tuck into the other, so the tube will be able to fit into another tube.
Shove smaller cut pieces into the hoops and discover the magical circles that will follow!
bitches be jealous of my circles.
and my bathroom selfies.
5. Now, you have your hoops and skirt. You've done some pretty good work, so take a snack break if you haven't already done so a few times already.

6. If this process hasn't been tedious up till now, it is about to rot some brain cells. What you do now is mark even spaces on the hoops to attach to the skirt, so the hoops are evenly aligned. You can mark the hoops in eighths for greater accuracy, but I, with the little patience, was fine only marking them at every fourth. You can do this by putting bits of duct tape around the tube or if you have some kind of marker that shows up on the tube (silver sharpies), that works too.

7. ALMOST DONE! Now you carefully use your yarn and the yarn needle to sew the hoops to the skirt. I sewed it from outside to inside, large hoops to small. 
Remember those markings you made so very long go, when cutting out the skirt pieces? They should correspond to the markings on the hoops. you can mark them more, if needed, such as numbering the hoops and corresponding markings to make sure you don't accidentally sew a hoop to the wrong marking. 
Here, the smart and sturdy way would be to follow the dreamstress' method (from the second tutorial mentioned above) of sewing through each bit on the hoop, but without a needle strong enough to stab through the tubing, I just sewed the tubing to the skirt as tight as I could, then hot glued the yarn to the tube. Maybe this will hold up, maybe it won't. Only time will tell. 

8. FIX THINGS: Try it on and see how you like it. Mine turned out heavier then planned for and the weight made it drag quite a bit. I ended up removing the last hoop and hemming the skirt by about 10". As the pic shows, with heels on, the skirt floats a few inches, which I quite like as it means not only is it less likely that it will get caught in my legs as I walk, but it is also less likely to pick up dirt and dust. 
Yours may also not turn out perfect. I recommend trying it on, noting things that could be better, musing possible alterations and if the mistakes are really that bad over a snack break, and then attempt to fix what you can.

THUS, HOOP SKIRT.

things I wish I could have done better: 
-photographed the process better
-drawstring instead of elastic, first time around
-fewer hoops, it's manageable, but a bit heavy
-it could be more accurate to Ice Queen's shape (needs to be a bit larger)


Saturday, April 27, 2013

INTRODUCTION ... dundundun

Hello! I am Esha Patel and I like to sew. Things I like to make include stuffed animals, dolls, and clothing. Although I've only cosplayed for two years and only done very simple ones at that, it's been really fun every time and  I definitely see myself cosplaying for a good few decades to come. Things I've cosplayed are Magnet Gumi (Vocaloid), Team Aqua Grunt (Pokemon), and Drifloon Gijinka (Pokemon).
Yep, tiny, tiny, super simple list.
I'm working on it, guys.
Cosplays I'm working on at the moment are Ice Queen (Adventure Time) Beth (Bravest Warriors) as well as helping out a few other cosplayers in my Adventure Time Group.
A few things I want to cosplay in the future are Hikaru (Angelic Layer)(ult. goal in cosplay for me), Steampunk Ice Queen (Adventure Time)  lolita BMO (Adventure Time), Female Mal (Firefly), TARDIS (Doctor Who), Magic Knight Rayearth (tbd who, planning on looking for a group), Dark Magician Girl (Yu-Gi-Oh), Arial (Blue dress- The Little Mermaid), and Nausicca (Nausicca of the Valley of the Wind).
On this blog, I'm be writing about the various methods and tutorials I'll try out and junk in the hope that maybe I'll be able to help other people out and other people can help me out. 
Another thing to mention is that I'm Indian (and proud). Let's be honest, if I was going for absolute accuracy, there aren't a whole billion dark skinned characters to cosplay (there are a good few: Zoe- Firefly, Storm- Xmen, Katara/Korra- Avatar, Yoruichi- Bleach). Basically I'll be working around and with my dark skin to try to make my cosplays look good, and if anyone has any hints or comments, I'll gladly take them. 
I'll also be periodically posting pictures of dolls and junk I make, just for a good time.
Basically I'm not the best cosplayer, but I'm learning :)
My Gumi Magnet and Domo (Fanime Con'11)

thanks for reading!